So a few years ago I created another channel on YouTube, called “Almost Ironman” but I’ve decided to stop posting there and just stick with “ScottPrestonTV“. Too much work when I don’t even have one channel doing well, to try to maintain two.
So in my spare time I’ve started working on my exoskeleton again. This time for the build I’ll start with the hand/gripper and will eventually move up to the arm and the full upper torso. I intend to capture enough footage over the next few weeks of the build out of the entire hand, then I’ll put together a long-form video of the process, electronics and a detailed blog post on the bill of materials, code, etc.
This is a short YouTube video of me testing the fitment from the wrist to forearm.
This next one is a SHORT of the electronics opening and closing the gripper.
In the next day or so I’ll get parts back from Send-Cut-Send, and might even break out the CNC for some customized parts. Stay Tuned!
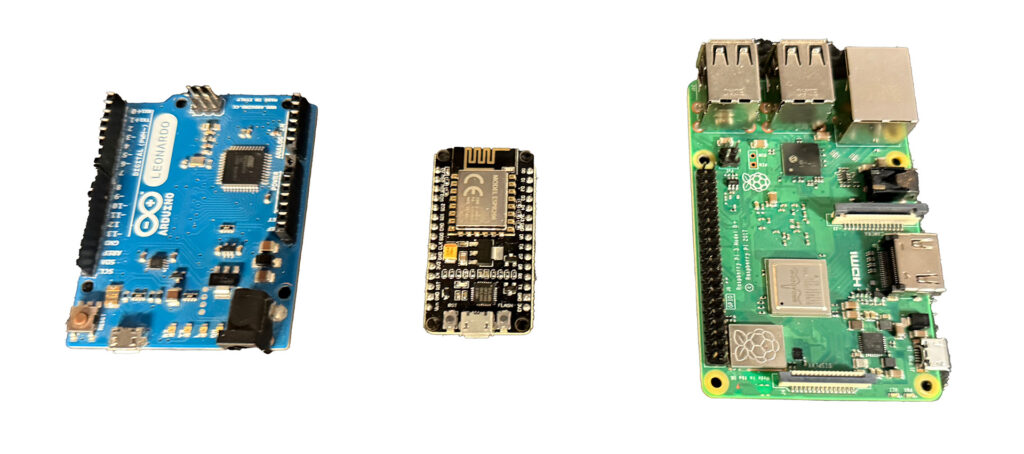
These are my “Go To” robot brains or robot “compute”. Below you’ll see an Arduino Leonardo ~$25, an ESP 8266 (NodeMCU) ~$8, and a Raspberry Pi 3 ~$45. I’ve included links to purchase below along with their specs as well as the specs of other similar items.
So why these items? Well the Leonardo has a friendlier USB connector, a Micro USB, and more digital, PWM and Analog inputs compared to the Uno. The ESP 8266 isn’t as powerful as the ESP 32, but the compile time is faster and I mostly work with WiFi vs. Bluetooth. The Raspberry Pi 3, also isn’t as powerful as the Pi 4 or Pi 5, but it also takes the Micro USB cable and the camera connector is more compatible with older less “Pure” cameras. Also because I do most of my work via API / Wi-Fi, it’s perfect for being a connector to all things on the Robot to the network.
Here’s a summary of all the stuff I’ve purchased over the years with some specs.
Device
Connector
Input Power Voltage
Memory
Speed
MIPS
Inputs
Notes
Arduino Uno
USB-B
7-12V DC (via barrel jack) / 5V USB
32K Flash, 2K SRAM
16 MHz
16 MIPS
14 Digital I/O (6 PWM), 6 Analog inputs, 1 Serial (UART)
While there’s errors in data in (calories in) and data out (energy expenditure) it’s your system that makes the difference on whether or not you lose weight.
Remember you need a calorie deficit in order to lose weight: Deficit = Calories In – Calories Out.
First you need to calculate your RMR or Resting Metabolic Rate or Basal Metabolic Rate. For this use an online calculator. Next you will need to add your total daily energy expenditure. (remember to actually calculate it vs. using the number below, they are illustrative.)
Sedentary (multiply by 1.2) ~2400 calories
Lightly Active (multiply by 1.375) ~2750 calories
Moderately Active (multiply by 1.55) ~3100 calories
Very Active (multiply by 1.725) ~3450 calories
Super Active (multiply by 1.9) ~ 3800 calories
Now while the numbers above are illustrative, there’s no exact way to know what your calories out are because your TDEE is based on the kinds of food you eat, how active you are and how much you fidget. The best way to figure this out is to do the following:
Track your meals daily for 1 week. Eat normally. Ensure hydration.
Weigh yourself the same time a day, preferably in the morning before you eat or drink and after you use the rest room.
Calculate your average weight and your average daily calories.
Now lets assume you’re around 2500 calories per day. If you want to lose a pound of fat or 3500 calories, you will need to eat 3500 less calories per week to create that deficit or 500 calories per day.
To avoid muscle loss, you will want to consume at least 1 gram per pound of lean body weight. So if you weigh 200 pounds and have a body fat percentage of 25%, your lean mass will be 150 pounds. Which means you’ll need to at least consume 150g of protein per day. 150 x 4 is 600 calories. Next you’ll need to divide the fat and carbohydrate calories amongst the remaining 1400 calories. If you pick 600 calories in carbs, thats 150g. Your remaining 800 calories can come from fat, 800/9 = 89g of fat.
Now that you know the amounts 150g protein, 150g carbohydrates, 89g of fat. You’ll need a meal planning system and maybe some supplementation to get enough protein. Typically I focus on protein first and let the rest fall in randomly, it works out if you eats lots of veggies. Additionally you’ll need a good food scale to ensure you’re calculating the right amounts of food.
Calories In is a really interesting problem, you would think it just comes down to measuring how much food is taken in but when you calculate fiber, mis-measurement, and or use a misleading app, trying to calculate that 500 calorie per day deficit for that 1 pound per week weight loss becomes very hard, or even impossible.
The amount of food you eat that gets converted to useful energy, and is apart of the metabolic process of converting glucose to CO2, Water and ATP (Energy) or converting fatty acids to CO2, Water and ATP. You can see the chemical equation for glucose below:
Glucose Formula C6 H12 O6 + 6O2 →6CO2 +6H2O+ATP (energy)
The interesting part is the human body is only about 25-30% efficient in doing this conversion, the rest is lost to heat or other metabolic processes. Additionally based on what you eat, when you eat, wether you are dehydrated or well hydrated this number can fluctuate. This is really important as sometimes the less you eat, the more efficient you get at converting this energy and the less heat you produce. Think about it, if our ancestors were not able to get more efficient, humans wouldn’t have survived when there were food shortages or the hunts didn’t go as expected.
How many of you use a scale to measure the amount of food you are consuming? How many of you just use the serving size count on the box? While the serving size is fairly accurate, unless you’re measuring this to the gram it’s very hard to measure. Additionally if you use a recipe combining all the ingredients the amount of oil, and understanding the exact portions makes it very difficult. Bottom line it’s easy to go 10% over here 10% over there, before you know it that 500 calorie deficit is actually just 100 or even over your daily caloric maintenance goal.
While Apps do provide accurate measures in some cases, some entries are crowd sourced. Take for example type “chicken breast” into your favorite calorie app or book. In a very popular app I received 10+ results. Was this fried, raw, baked, measured by “medium or half of a breast” or ounces or grams? Was it natural or full of saline? The measurements of raw skinless boneless chicken breast by the USDA per 100g is: Protein 23g, Fat 1g, Carbs, 0g, Total calories 107. The measure for cooked chicken breast by the USDA 100g is: 31g of protein, 3.5g of fat, 0g of carbs for 165 calories total. This is a difference of 54%. If you’re trying to count calories and measure the wrong thing there’s a high chance of error, also, who eats 100g of chicken breast in the US?
In conclusion there’s a lot that go wrong even with technology and dedication.
Taking a short break from technology and building things to talk about fitness and weight loss. I’ll present a 3 part series of posts to talk about what I’ve learned over the past few years.
There’s been a lot of books I’ve read over the years about losing weight and getting fitter. Low Carbs. No Meat. 10,000 Steps. Count Calories. But it wasn’t until I went to have my Resting Metabolic Rate (RMR) measured that I truly woke up to the real science of metabolism and weight loss.
A metabolic cart does something real simple, it measures Oxygen (O2) In and Carbon Dioxide (CO2) Out. It does this for about 20 minutes and then it inputs the results into the Weir Equation and calculates your calories per minute. See Below:
Weir Equation is EE (kcal/min) = (3.941 x VO2) + 1.106 X VCO2)
To substitute my measured numbers (3.941 x .354L/min + 1.106 x .292 L/min) ~= 1.718 * 1440 = 2474 calories / day
Fascinating. Metabolism is really just about how much O2 you breathe in and how much CO2 you breathe out. But while I found this super helpful, what about all the folks that say steps per day or you must do cardio? Well this is a little more complicated but it still all comes back to Oxygen.
A MET or Metabolically Equivalent Task. This is defined as 3.5 milliliters of oxygen per kg of body weight per minute. Now this will vary per person and some people will burn more oxygen per minute some will burn less based on fitness level. Here are some sample MET values below.
Activity
METs
Walking 3mph, 10 minute mile
3.5
Running 6mph, 10minute mile
9.8
Bicycling 10-12mph
6.8
Swimming freestyle
7.0
Weight Lifting
3.0
Sample Activities / METs
So the equation for this is below:
Calories Burned = MET value x body weight in kg x duration in hours
Keeping Math Simple, walking 20min/mile pace yields, 3.5 Mets x 100 kg x 0.333 = 116.55 calories per 2000 steps. Subtract your RMR from this number, so at rest a 100kg person burned 34.32 calories, for net gain of 82.335 calories per 2000 steps.
So the cardio crowd or the 10,000 steps crowd wasn’t wrong. A 100kg person will burn 82 more calories per 2000 steps walking than sitting on their butt. But if your fitness tracker or your treadmill typically has these numbers in the 150s or 200s per 20min it’s way off.
I decided last night to renew my Apple Developer Account and decided to work on apps again. As a result my old App came back to the App Store. This app is the “Are You Worthy?” App, which is basically a Magic 8 Ball to test to see if you’re worthy of wielding Thor’s Hammer, Mjolnir. Nothing fancy just for fun.
This is a small robot I hooked up to my PC and I added some TTS (Text-To-Speech). I think this is around 2007, so it’s pretty old footage. For anyone that recognizes it, this is the same J.A.R.V.I.S. voice I use for my house and during my CodeMash talks.
Same robot but doing some computer vision. I ended up using blue because of the low light and the cheap webcam tended to make everything green & red.
Feynman Series – Navigating The Sidewalk
Little bit more coding than I thought to make this work. This is a smaller version of the Feynman Series robot, the Feynman Jr. series. I ended up using some different motors as well, two NPC-2212 with 6″ wheels. Turns out it was a very rough ride, eventually the webcam servo mount broke because of the shock.
This is a continued post about my robots as I prepare to archive and rebuild ScottsBots.Com.
Feynman MK1 – 2002
The “Feynman” name for my robots actually comes from the names of the computers in my house, this computer housed in wood below was called Feynman, and I happened to turn it into a robot.
This robot came equipped with a robot arm, sonar, a compass, and a webcam. The chassis was made from plywood and PVC. The motors were Black & Decker cordless drills. I powered the drills via speed controls from robot control cars. It had speakers and could “talk” using primitive text to speech. It was still powered via 110 VAC.
The computer itself was an AMD K6-2 500MHz, running Windows 2000 and Visual Basic 6. I programmed and tested it using VNC. I used a Basic Stamp 2 to get sensor readings from the sonar, compass and infrared sensors. I used the Scott Edwards Mini-SSC to control PWM channels on the speed controller connected to the drill motors.
Computer Vision Tinkering
From the image above, I also started to tinker with computer vision. This was a simple VB6 thresholding program, where i looped through all the pixels and if they were below a certain number I changed them to zero (black) and if they were above it, I changed the pixel to 255 (white).
Feynman MK3 – 2003
This version contained a lot of upgrades. I still had a plywood base but I used 80/20 Aluminum Extrusion for the chassis and I used 2 33AH Batteries for power. I upgraded the drive motors to use two windshield wiper motors from an F-150. I upgraded the speed controls to two Victor 883 from IFI Robotics @$150 each. I upgraded the webcams to Two Pyro 1394 Firewire webcams.
The computer changed to a lower powered version. VIA EPIA M10000 Mini-ITX with 259 MB of ram and a 20GB HDD. It had Wi-Fi and all the software to program and run it was 100% Java.
This is a picture of the base of the robot. The drive system used coupling nuts connected directly to the shaft of the wiper motors and the wheels. This wasn’t very efficient and the motors themselves didn’t prove to be that reliable. Another thing I didn’t do well with this design was account for the spacing of the caster wheels. They were a little above the drive wheel and movement of this robot was a little jarring as it would rock back and forth when starting and stopping. This rocking eventually led a really difficult time doing computer vision with the two cameras, ultimately i needed a better solution.
This design and software to run it is outlined completely in the book. Additional upgrades include PVC from McMaster Carr. Two new NPC-41250 Motors from National Power Chair. 3 SRF-4 Devantech Sonar Sensors. I also removed the front caster made it a little backwards heavy so it rested on the batteries. This created a much more stable platform for moving around doing navigation.
Feynman MK6 – 2005
Once I wrote the book I started getting invited to speak at local user groups and conferences about Java and Robots.
I created a switch so that I could remote control the robot as I would drive it places. This is the robot at some location in town, it could even be a conference. This robot is mostly the same as Feynman 5, just a little taller with a single webcam.
I think this was the first version of my robot I took to CodeMash. as speaker.
Feynman MK7 – 2006
This is the final version of the robot.
Most of this robot remains unchanged to this day. I removed and upgraded the computer a few times, eventually switching to a Raspberry Pi, but ultimately the robot proved too difficult to transport. It weighted about 200 pounds and required 2-3 people to load into the truck to transport to conferences and meet-ups. Currently this robot sits in the garage unused. 🙁
I thought I’d put a post together summarizing some of my robots as I prepare to archive and rebuild ScottsBots.Com.
TetherBot – 1999
I built this robot in 1999. I hacked two hobby servers (Futaba 3003) to make it move and built my own sensors with some parts from Radio Shack. To move this robot I connected an ethernet cable to the parallel port on my Windows 98 Machine.
Baby Joe – 2001
This was my second and third robot. I reused the hacked servo motors from TetherBot, but this time I used a Basic Stamp microcontroller to control the IR sensors and send PWM signals to the servo motors. I also used Aluminum and plexiglass as construction materials.
Rovey – 2002
I started to experiment with different chassis materials (this time PVC). Also because I had more servos (pan/tilt) webcam and 2 drive servos (same ones) I upgraded the controller from a Basic Stamp 2 to a Scott Edwards Mini-SSC. This device allowed me to send commands to the servos with 3 bytes (255, servo(0-7), position (0-255). So (255,0,127) would send a stop/neutral pulse to servo connected to the 0 pin. (255,0,0) would send full clockwise pulse to the servo on pin 0. (255,0,255) would send a full counter clockwise pulse to the servo on pin 0. This is a great little board and one I use to this day on some of my new robots.
I created this robot for a talk at COSI. The idea was that students could login and control the robot from a web browser. The idea of the talk was to connect with Mars Pathfinder robot which at the time was discovering it’s way around Mars. The photo isn’t great I tried to create a Martian landscape and added rocks for the robot to explore. The robot was tethered so it could have continuous power, but to prevent the robot from getting tangled I connected the robot wires to a string hung from the ceiling.