I’m Scott Preston
Welcome to my blog! I’ve been running this domain for quite some time, and over the years, it’s evolved into a space where I share my passion for building robots, exoskeletons, and other cutting-edge projects. While much of my past content has been archived, this blog remains a place where you can dive into the exciting world of robotics and technology.
By day, I advise companies on AI strategy, software architecture, and legacy modernization. But after hours? I get hands-on. I code, tinker, prototype, and test ideas the old-fashioned way—by building them. Whether it’s understanding where tools like Cursor or Claude can (and can’t) help, or wiring up a new robotic limb, this is where I share the process.
Occasionally, you’ll also find updates from my speaking engagements at tech conferences and user groups. I enjoy discussing the intersection of hardware innovation and JavaScript, exploring how software drives the smart systems we build.
Stay tuned for more robotics projects, exoskeleton builds, and insights into the tech world!
Latest Projects
Decided to move back to the exoskeleton. Have a battery powered lower arm now.
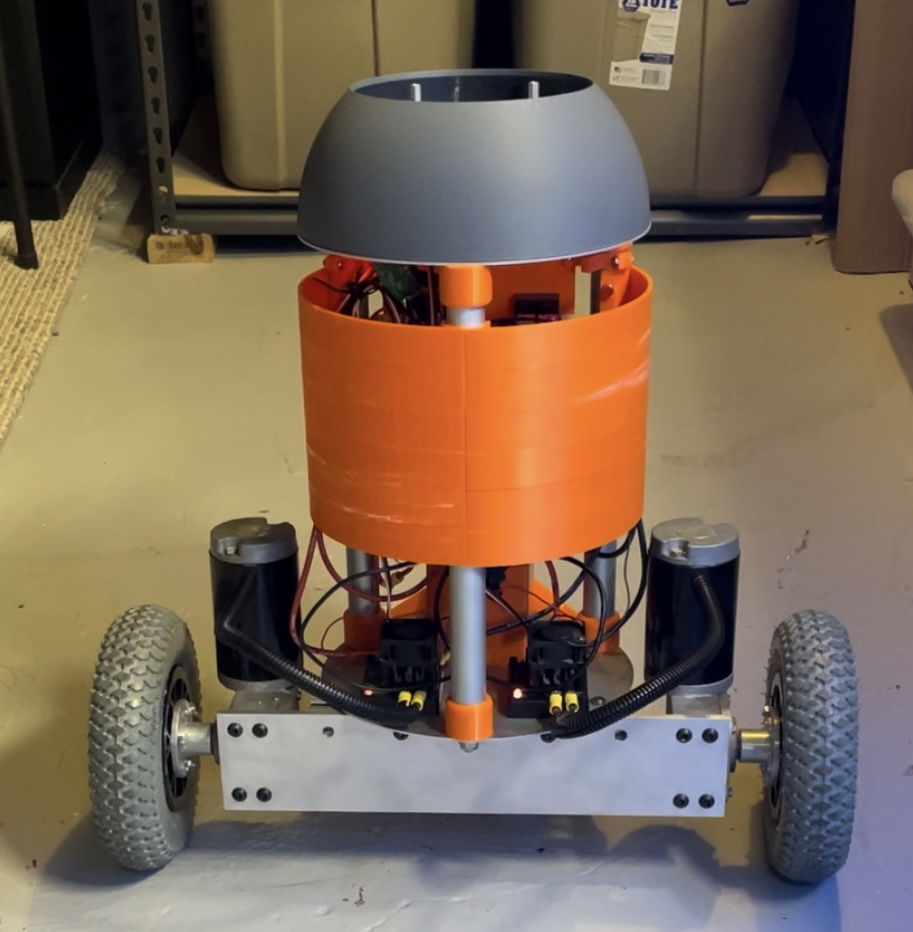
Robot Upgrade
I’m currently modernizing my old robot, Feynman Jr., with new components and advanced tech. The updated version will feature a Raspberry Pi 4, a silent speed controller from Pololu, and cutting-edge hardware like a Lidar range finder, camera, speaker, and microphone.
Once completed, this robot will be fully autonomous, navigating around the house with ease. Stay tuned for updates on this exciting DIY robotics project!
Also if you want updates this robot, make sure you head over to my YouTube channel, @ScottPrestonTV.
Thanks!
Legacy Projects
This is an exoskeleton I built in 2017 for the “CodeMash” conference. Still one of the coolest builds I’ve done. Lots to improve upon, but I’m pretty happy how it turned out while building on week-ends for a few months.
Recent Articles
These are some of my recent blog post, warning, some may not be related to robotics or exoskeletons!
-
M1 to M4: The Apple Silicon Performance Ladder
I was curious and wanted a list with no advertisements. Apple’s M-series chips have moved fast in just a few generations. What started with the original M1 as a huge leap over Intel Macs has expanded into a full ladder of standard, Pro, Max, and Ultra chips that scale from everyday laptop performance to serious…
-
Trip Radius Planner – A Tiny Tool for Big Roadtrip
Ever want to take a road trip… but have no idea where you actually want to go? Same. So I built a quick tool: Trip Radius Planner Just type in how many hours you want to drive, and it shows you a map of how far you could get. That’s it. No logins, no planning…
-
Created A Playground
I’ve really the playground, you know the days when you could just FTP a few files to a directory and bam it was live on the internet! So I created one again called https://playground.scottpreston.com. Right now I just a a few examples projects/experiments.
-
Some of my Favorite Business Books
Over the years I’ve ready many business books. I thought I would spend some time talking about my favorite top 5.
-
YouTube – ScottPrestonTV & Exoskeletons
So a few years ago I created another channel on YouTube, called “Almost Ironman” but I’ve decided to stop posting there and just stick with “ScottPrestonTV“. Too much work when I don’t even have one channel doing well, to try to maintain two. So in my spare time I’ve started working on my exoskeleton again.…
-
Goto Robot Brains
These are my “Go To” robot brains or robot “compute”. Below you’ll see an Arduino Leonardo ~$25, an ESP 8266 (NodeMCU) ~$8, and a Raspberry Pi 3 ~$45. I’ve included links to purchase below along with their specs as well as the specs of other similar items. So why these items? Well the Leonardo has…